Web Authenication Primer
The Chassi Lifecycle API supports the use of a standard HTTP POST requests to notify your application when lifecycle related events occur. To successfully use this feature, a Chassi webhook notification expects your application to provide an HTTP endpoint which Chassi will call and send data associated with a given lifecycle event. You will be providing this url when you set up your lifecycle event subscription (See Using Process Map Events and/or Using WIP Definition Events).
Chassi webhook calls support the use of a standard Oauth2 access token for secured endpoints which utilize the Oauth2 authentication protocol. The Oauth2 client credentials protocol access token is more secure than when using a typical API Key, so your application will have to include functionality to validate an access token when received with each HTTP webhook notification POST request.
Thus, in order to utilize Chassi's webhook functionality, you will need to set up both an authorization server/provider as well as a resource server in order to add access token authentication to your webhook url endpoints. Also note that while it is not necessary to create the authorization server and resource server as a single application or service, it will be more simple to set up validate your endpoints with a token if they are.
Refer to our OAuth 2.0 Primer for further details on what OAuth2 security is all about.
Preparing your API webhooks for use with OAuth2 Access Token security
Set Up Your Authorization Server
An OAuth2 authorization service will be required to generate and validate access tokens. At a minimum it must support the OAuth client credentials grant type and return a valid JWT access token upon request with appropriate credentials. For more information regarding Authorization Servers, see this useful guide.
The process for setting up an authorization server will vary depending on the language and framework you are using. However, the process usually involves the creation of client configuration(s), a token store, and an authorization token configuration endpoint for receiving token requests.
Client Configuration:
In the client configuration, you will be able to set up and register your clients with a client_id, client_secret, and scope that will be used with the client credential oauth2 call. This process, depending on your application's architecture, can be set up to be stored in memory or in your data source.
Token Store Configuration:
When configuring your token store, you are have various options, depending on the language and framework used. Some options include manually changing your token's expiration time from its default, having the token stored in memory or in your data source, and setting up a jwt token to name a few. Refer to your framework's documentation to set up your token to your application's needs.
Authorization Configuration Endpoint :
This configuration is how you add your token store to protect endpoints that are set within your resource server. Following the addition of your token store, you will also need to add an authentication manager that will authenticate incoming calls to your resource server against your token store.
The process of setting up your authentication server can be involved and may differ greatly from language to language or framework to framework. Refer to your framework's documentation for implementation resources, or refer to the Example Frameworks for Oauth2 servers section below for some sample guides.
A sample call to your authorization server with curl, would look like the following:
curl - v - X POST \
-d "client_id={client_id}" \
-d "grant_type=client_credentials" \
-d "client_secret={client_secret}" \
-H "Content-Type: application/x-www-form-urlencoded" \
http: //localhost:8080/oauth/token
This, in turn, should send a response similar to the following:
{
	"access_token": "cf96e458-12a1-4854-908d-419a35118363",
	"token_type": "bearer",
	"expires_in": 43199,
	"scope": "read write"
}
Set Up Your Resource Server
Now that your authentication service is set up, you can utilize the access tokens to protect your application's resources. The resource server's purpose is to host those protected resources and to be capable of accepting and responding to protected resource requests using OAuth2 access tokens. Your intended webhook urls are required to be token protected and thus must implemented within your resource server in order to be used with Chassi's webhooking feature.
Most common web frameworks have the tools required to set up a filter chain, containing request matchers and access rules for your protected resources, keeping them protected until it is provided a token from your authentication server. This must be set up in your resource server for all endpoints that are going to be used as webhooks with the chassi api.
This process usually involves configuring your application's HTTP security settings with the proper path patterns to specify which endpoints you want to be protected behind a token by setting them as authenticated access only. Also during this configuration, you may also choose to set up any exception handling you see fit (i.e. access denied exception).
Once your configuration is complete, an example call to your api should look similar to the following:
curl - v - X GET \
-H "Content-Type:application/json" \
-H "Accept:application/json" \
-H "Authorization: Bearer ${Token}
'http://localhost:8080/sample-endpoint'
Where Token is retrieved from a call to your authorization server (see above example call).
When preparing your endpoints as webhooks for Chassi's eventing feature, they must be able to receive the payloads as described in our reference documentation for Process Map Events and/or WIP Definition Events, however choosing to utilize said payloads is up to you. Also note that Chassi's eventing API will wait 10 seconds for an acceptable response (see Webhook Url Acceptable Responses) before logging a timeout error.
Webhook Url Acceptable Responses:
| HTTP Response | Description | Notes |
|---|---|---|
| 200 | OK | Standard successful response with body |
| 204 | No Content | Successful response with no body |
| 4xx | Client Errors | Status code covering situations in which the error seems to be caused by the client |
Example Frameworks for Oauth2 servers
The authorization and resource servers can be set up in a variety of different languages and frame works. A few examples would be:
- Spring Security for Java : Spring Boot Security Oauth2 Example
- Ruby on Rails : Doorkeeper-Rails Oauth2 Example
- OAuth2 Server Library for PHP : Oauth2 Server Library Cookbook
- Flask or Django for Python : Example Python Auth Server Guide
- node-oauth2-server for Node.js : Oauth2 Server with Node.js
Keep in mind, these are but a few examples of what tools are available.
Registering your Webhook Credentials
Once your oauth2 servers are complete, you are going to want to register your credentials on
Chassi. The following steps will guide you on how to do so:
Step 1:
Open the API MANAGER drop down and select Webhook Credentials
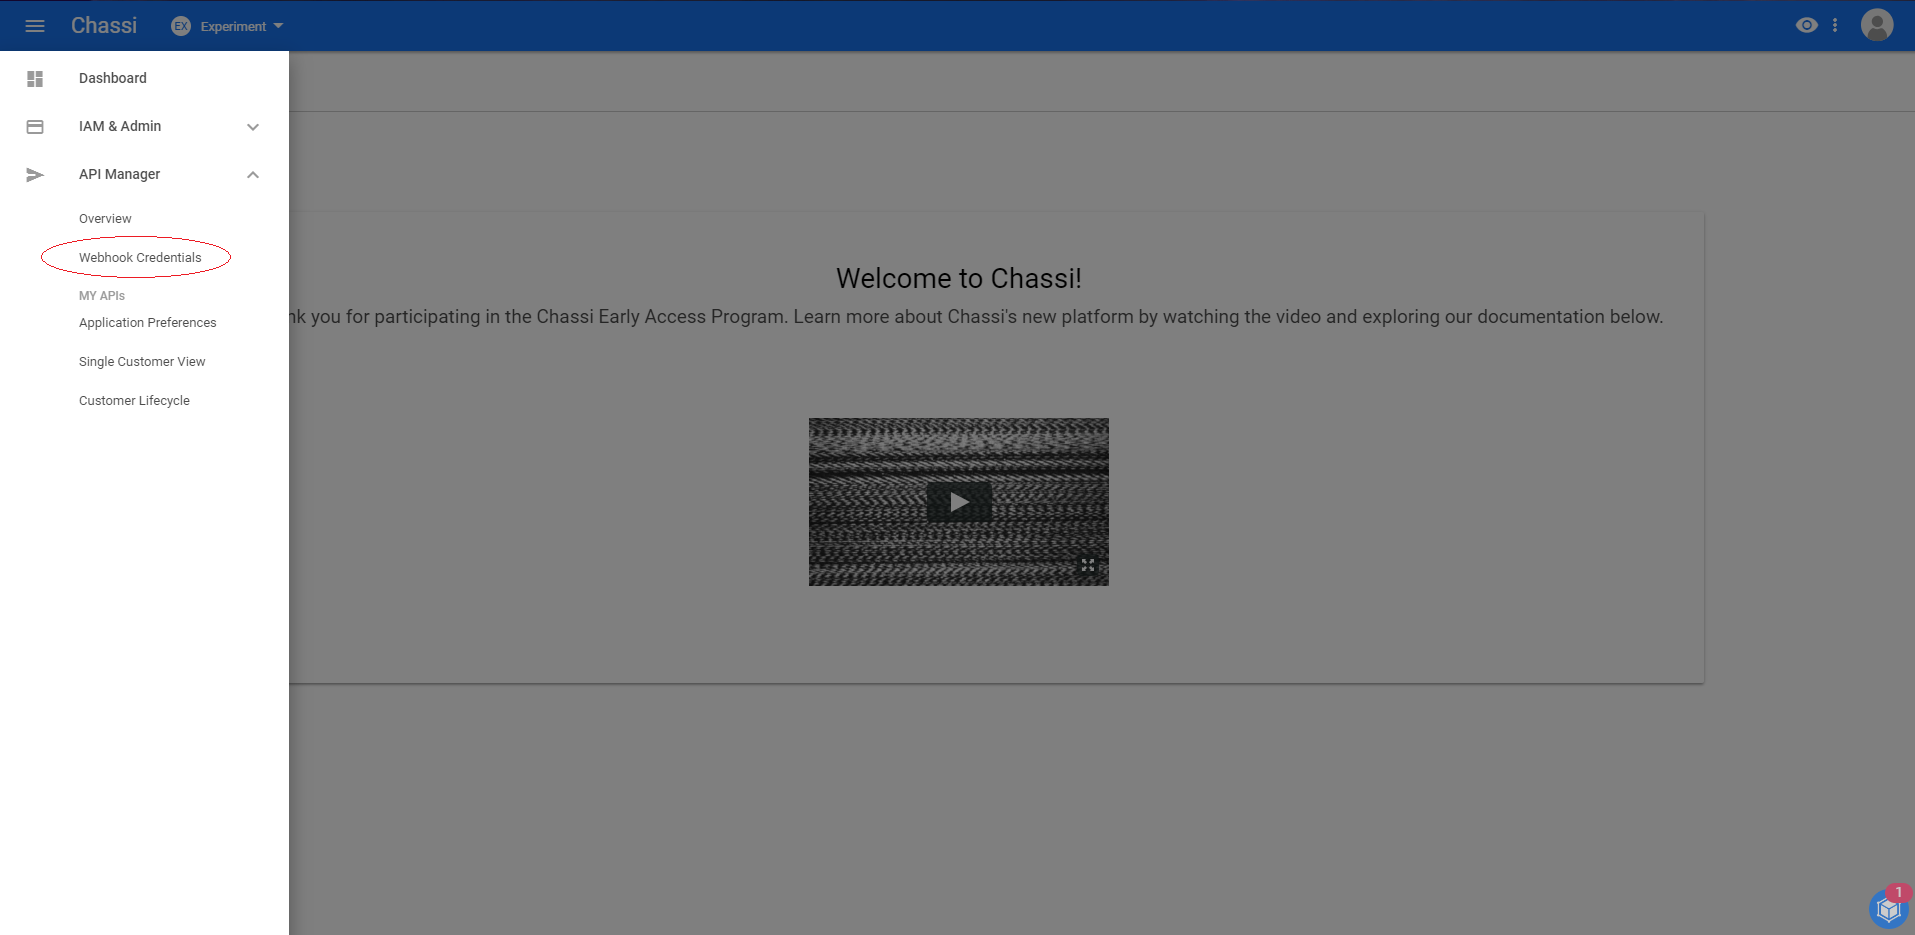
Step 2:
Select ADD NEW CREDENTIAL
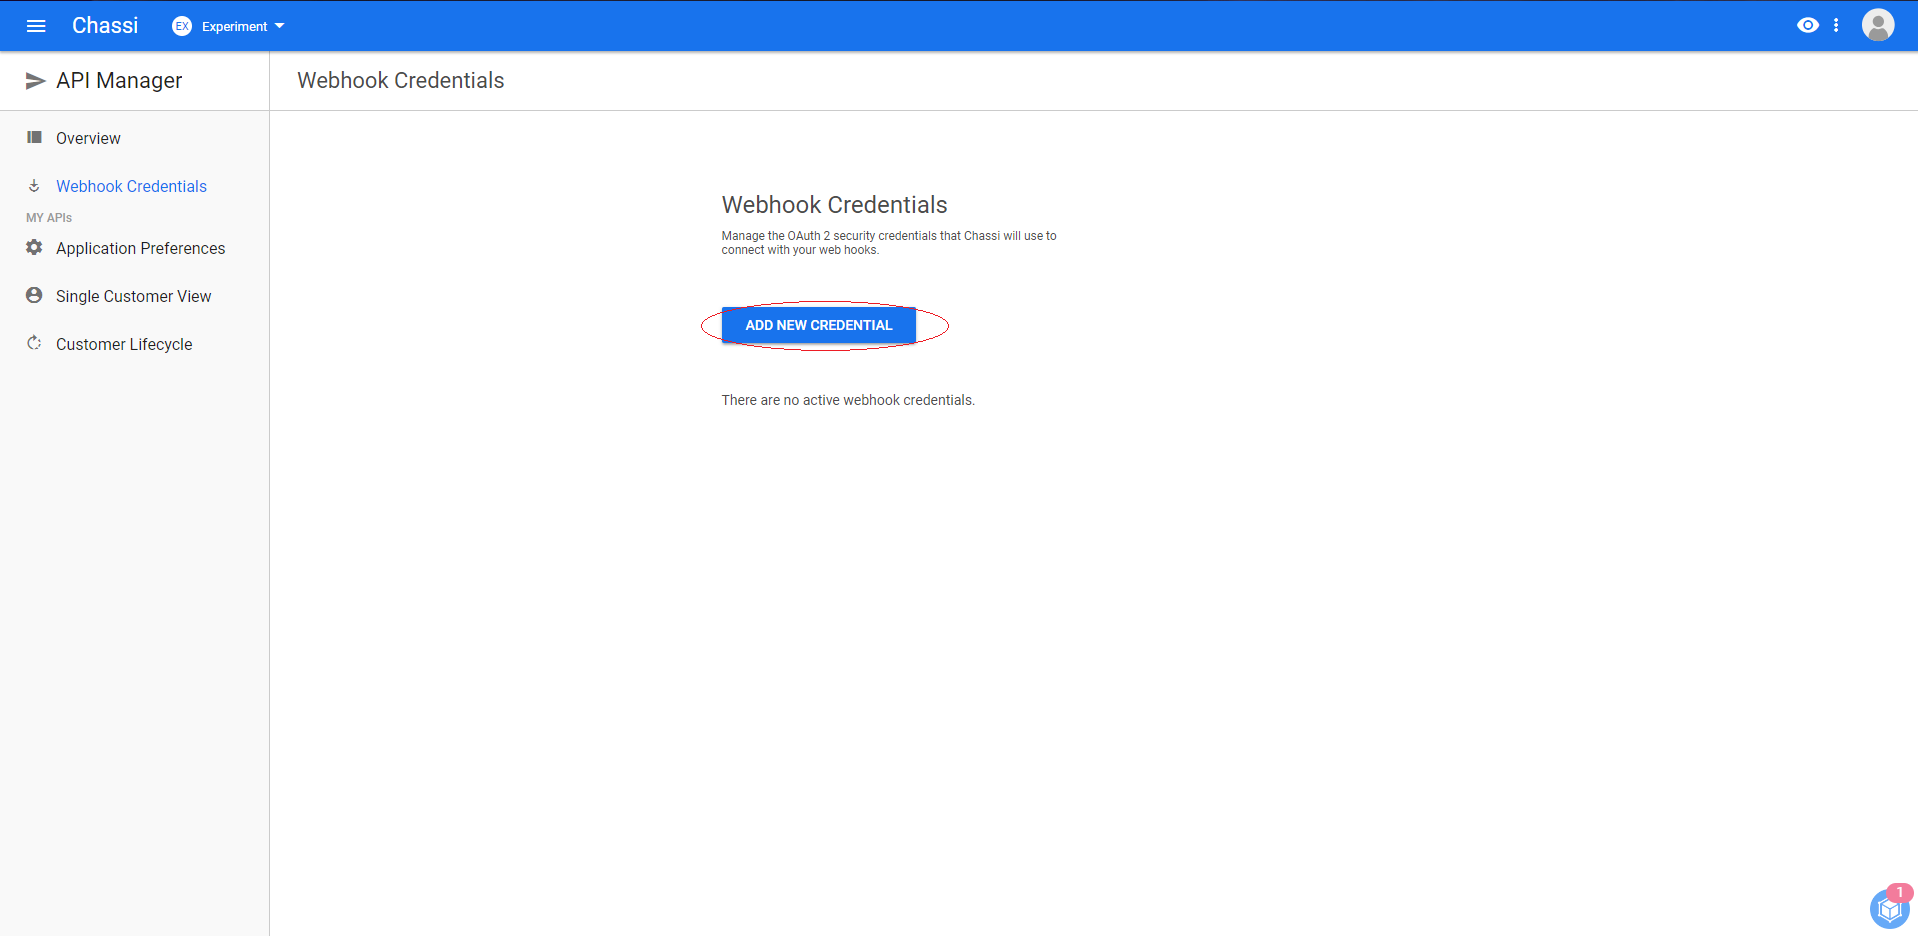
Step 3:
Fill in your authentication credentials and click on SAVE AND TEST
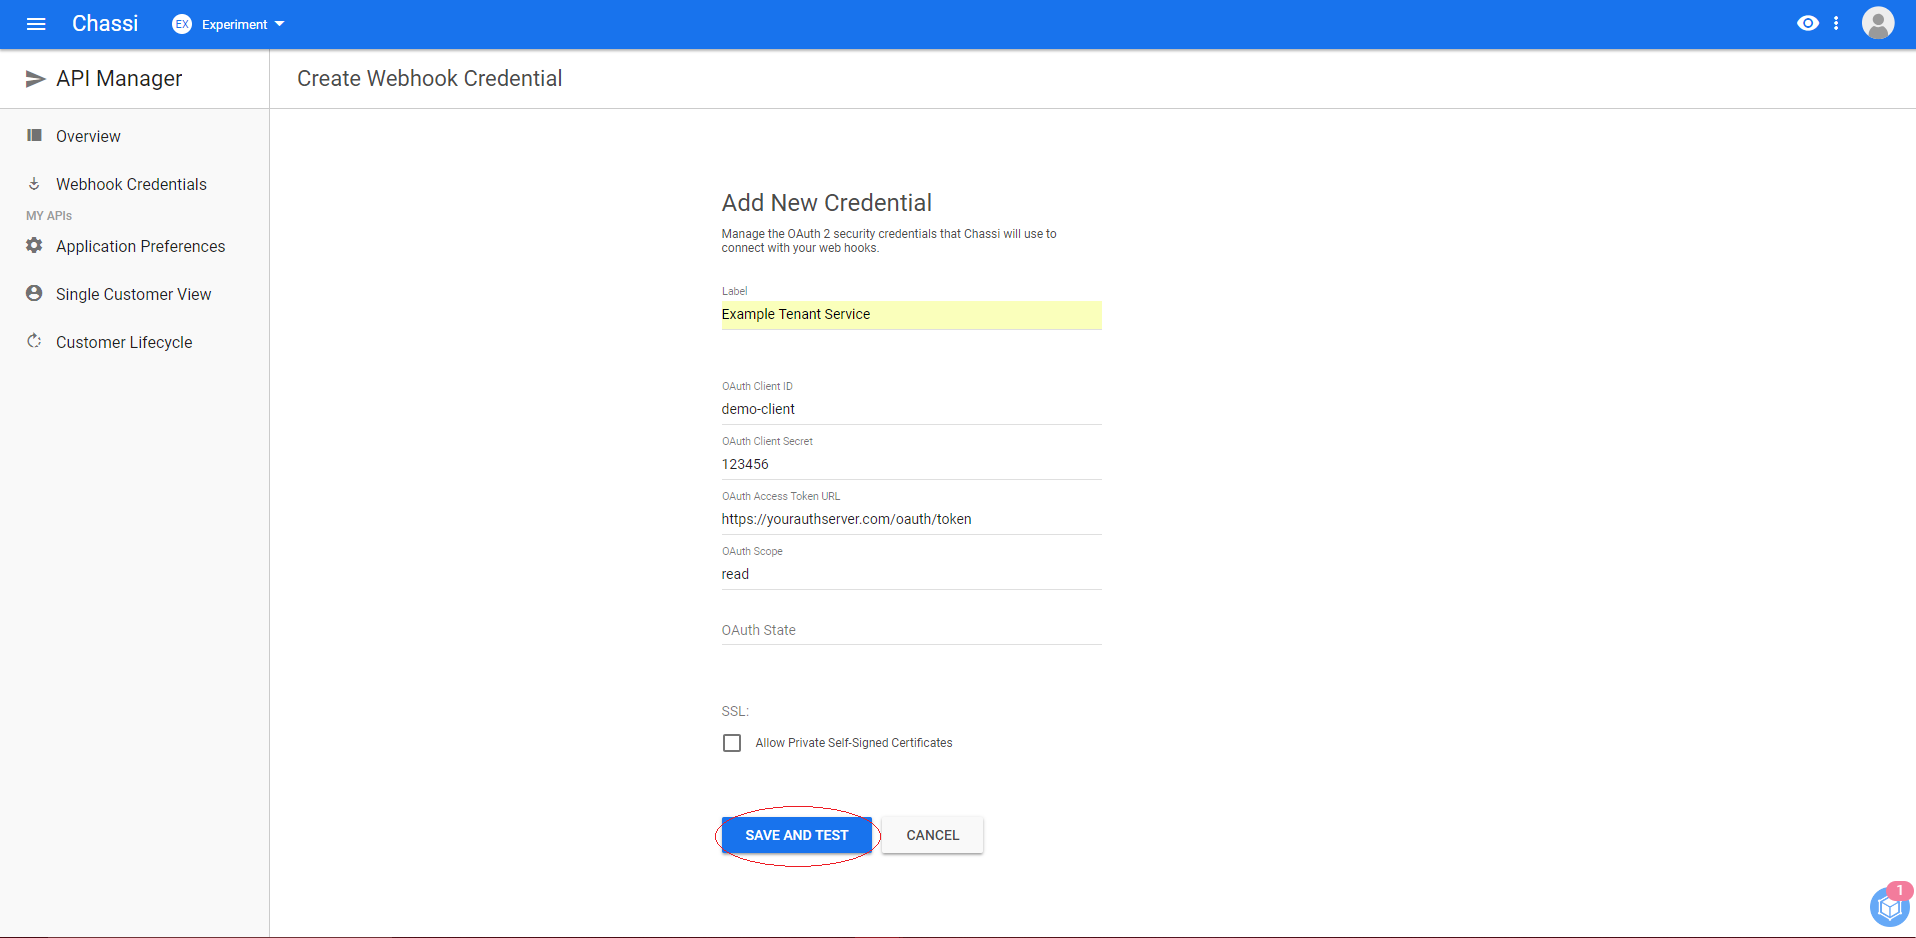
Step 4:
A pop-up to test your connection will appear. Click TEST
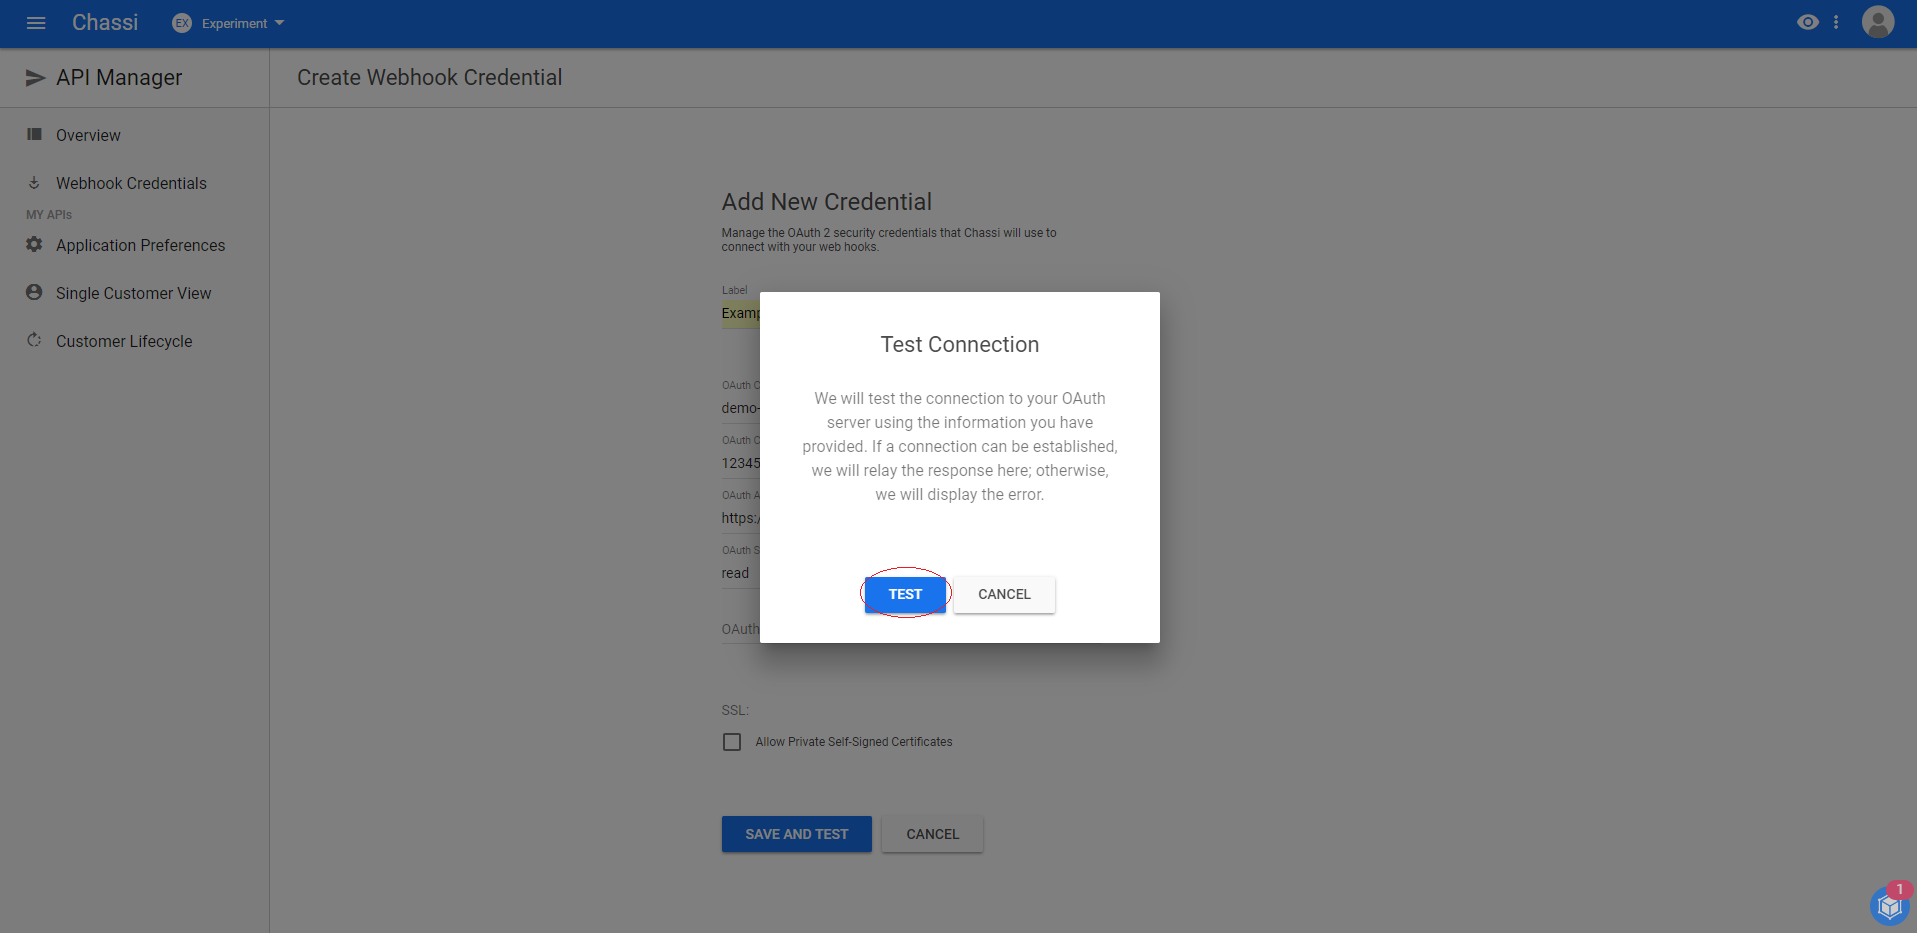
Step 5:
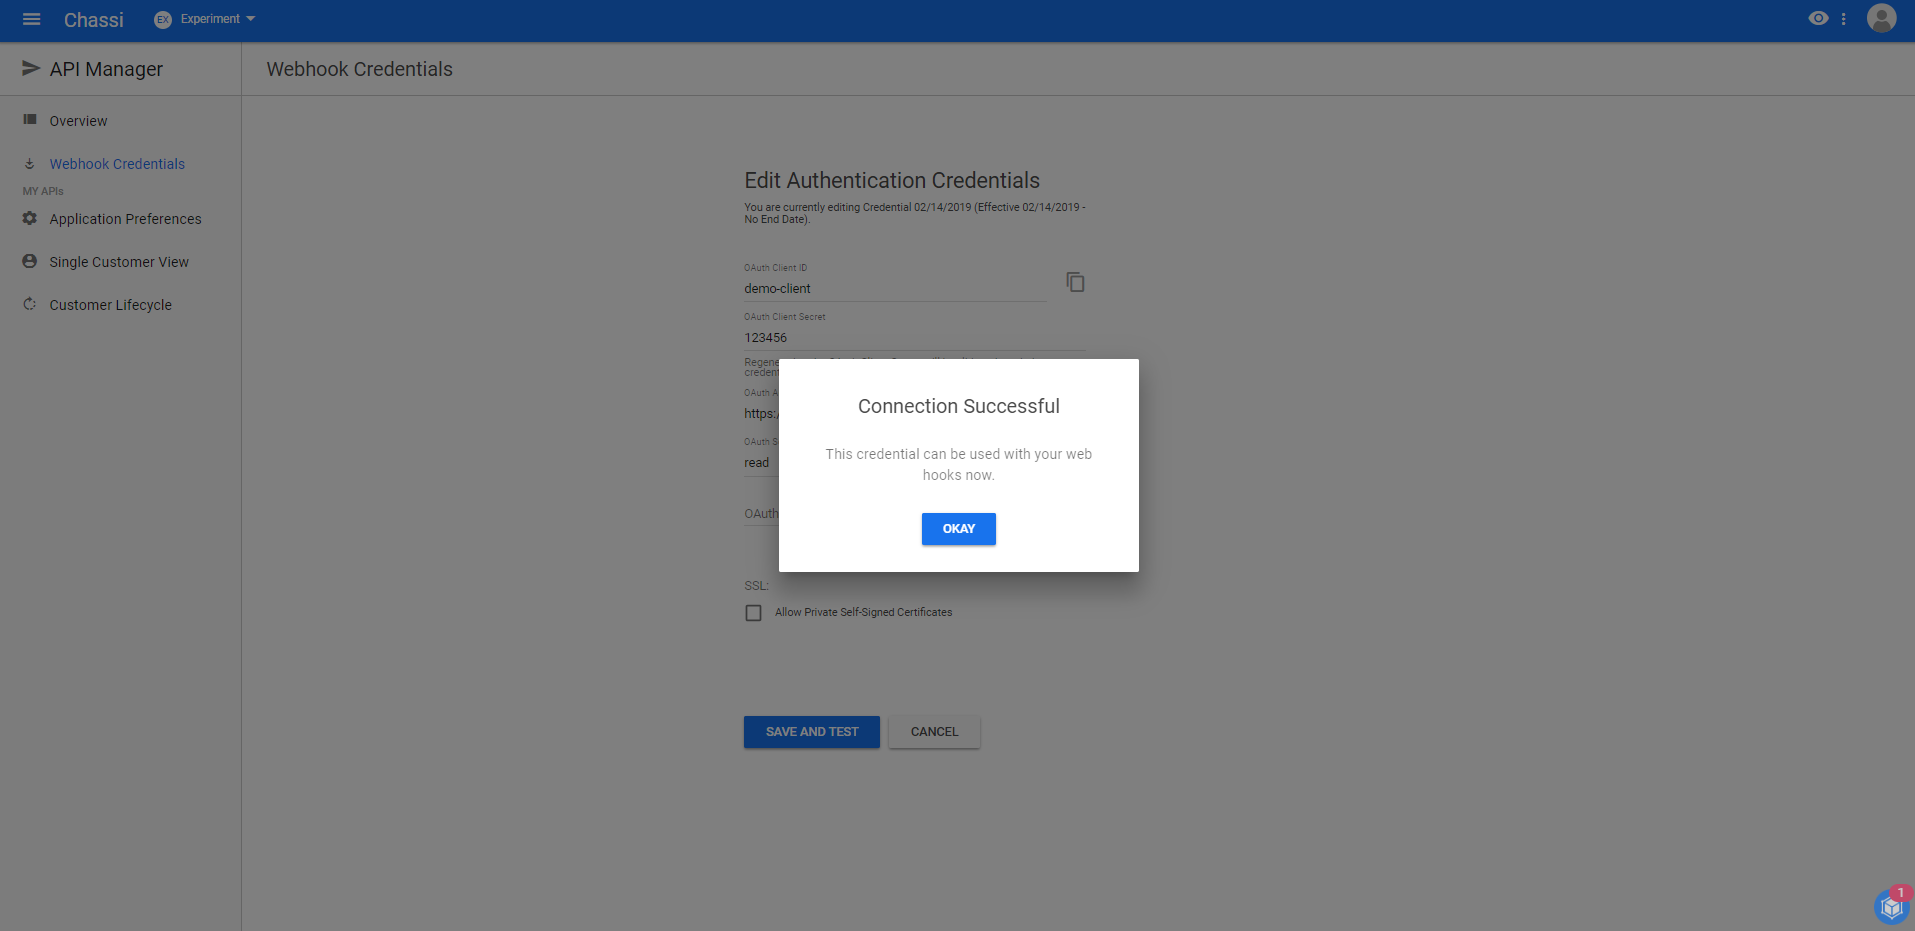
Once the connection is verified, you will be notified of the successful connection.
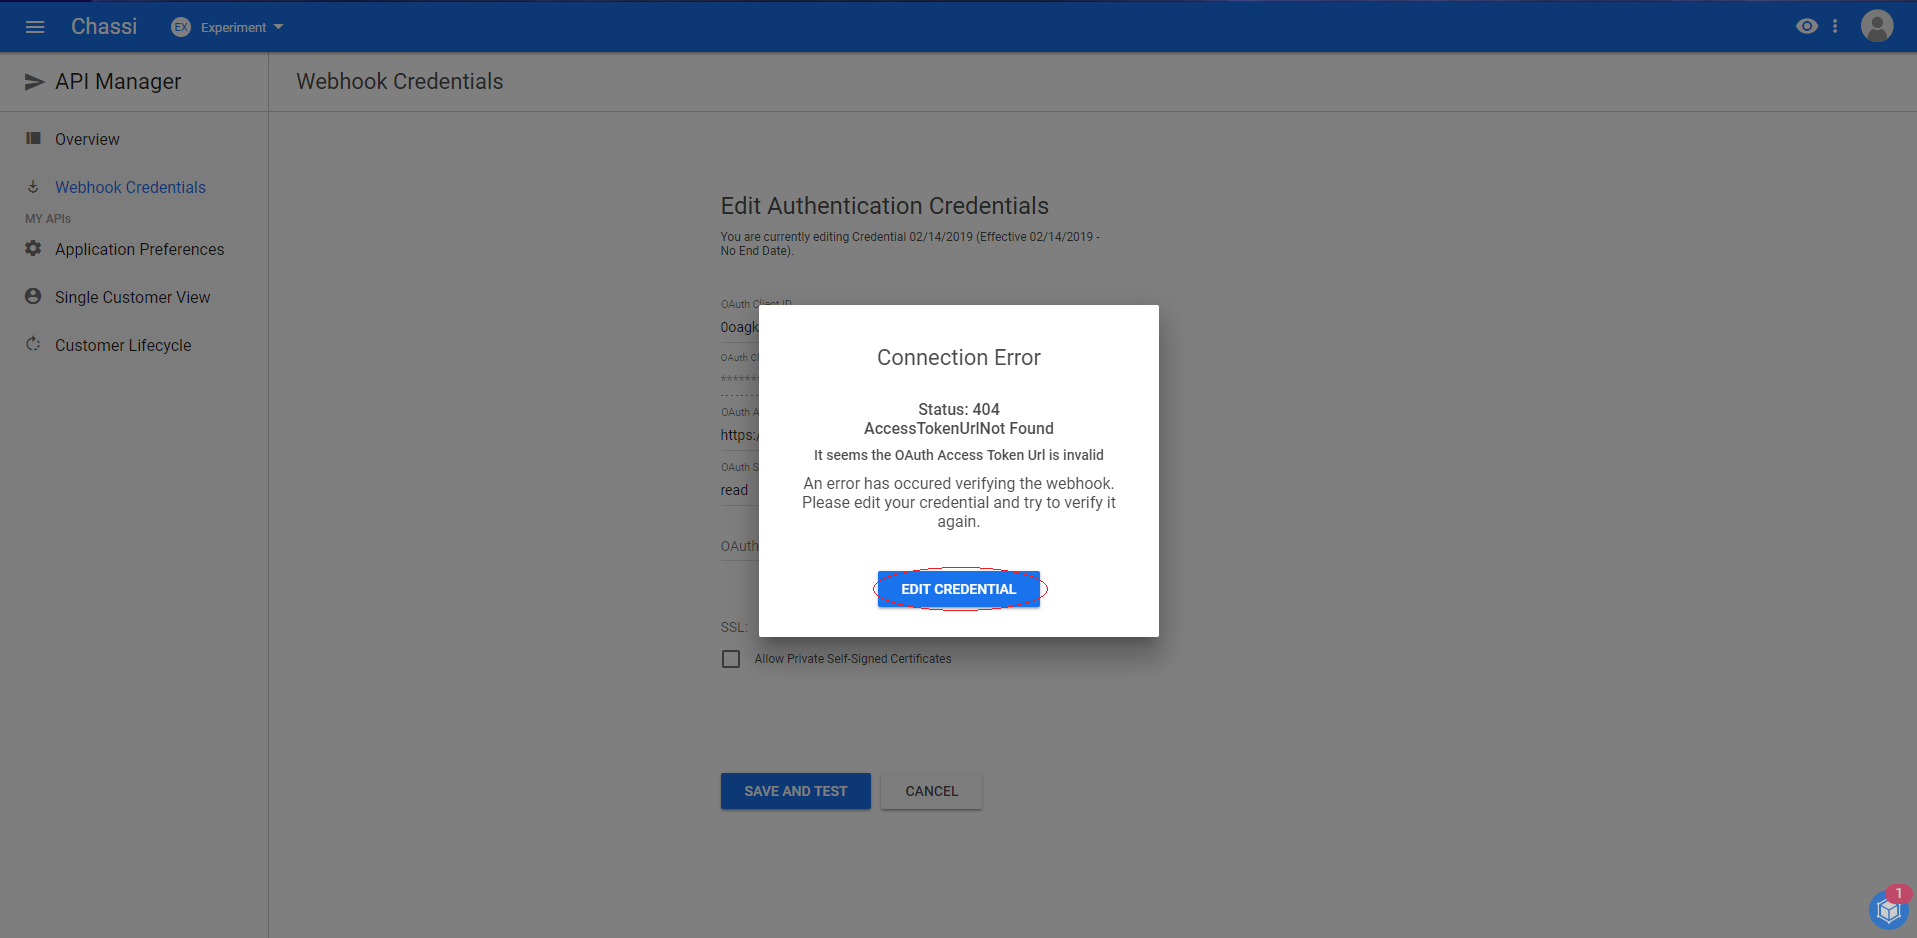
CONNECTION ERROR:
A possible error screen will occur if your credentials are incorrect. Edit your credentials and try again.
Once a successful connection is established, you are now ready to use Chassi's webhook and eventing feature.
Updated almost 7 years ago
